Often, when dealing with software, there are tasks which take long to compute. As such, you wouldn’t want to compute this directly in an API, but use other methods to calculate it and return it to the user at a later time. (Think generating a report, or dealing with large amounts of data.) Simply put, we don’t want to tie up precious threads in an API with something that could be handled elsewhere (maybe in a service, or lambda function, etc.). My code for this blog can be found here.
If it’s decided to use a service (windows or other), then there needs to be a way to communicate with the service. That’s where a queue comes into play. A queue can be used to send data to a service, and it can broadcast to multiple services or distribute data evenly between services. There are many types of queues out there depending on platform and usage (AWS has SQS Azure has it’s own solution, etc.). RabbitMQ has a cloud based service as well, it’s called CloudAMQP and works great. In this blog, I’ll walk the reader through installing RabbitMQ on a Windows machine, and I’ll write two short programs displaying its usage – We’ll create a Work Queue that will be used to distribute time-consuming tasks among multiple workers
First things first, we need to install RabbitMQ. Head over to the RabbitMQ Windows Installation page (here) and you can either install it via Chocolatey or there is also an EXE installation. If you use the EXE installation method, then you will need to install Erlang (and both Erlang and RabbitMQ should be installed using an Administrator account). The installation page contains which versions of Erlang is currently supported (and there are links on the page).
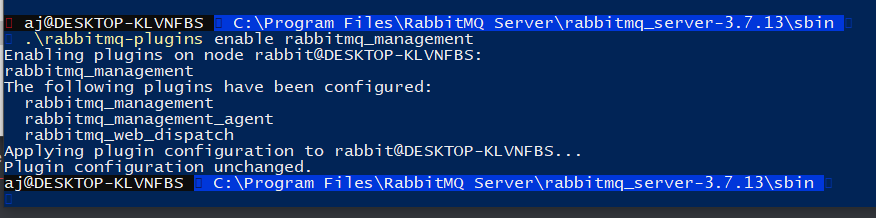
Once installed, let’s install the web interface and verify everything is working. Navigate to the RabbitMQ installation folder, and select the sbin folder from there. There should be a few batch files there. Open a PowerShell or command prompt there. From there, type in:
rabbitmq-plugins enable rabbitmq_managementIf you’re in the correct folder, you should receive a response that it’s installed.
Next, in a web browser navigate to http://localhost:15672/. You should see the RabbitMQ login page

To login, the username and password for localhost are both ‘guest’. So login and you should see the RabbitMQ dashboard, which should look similar to this.

You can do a lot from the dashboard. From monitoring queues, viewing current performance, to purging or deleting queues. In the image above, (about 2/3 down) it shows there is one node and has an uptime of 8 days and 2 hours. Good deal.
For my code, please clone from GitHub here and I will explain how it is setup.
Ok, so here’s my solution overview:

I have a Receiver project (which receives the payload) and a Sender project (which places the payload on the queue) and a Shared project (which only contains the payload that both projects use). Let’s look at the Payload.cs file in the Shared project first
namespace Shared
{
    public class Payload
    {
        public string Message { get; set; }
    }
}
So, this is pretty simple. It is simply a class that contains a message. The Sender will send the payload over the queue and the Receiver will receive it. Pretty simple.
The other projects have the following NuGet packages installed for both of them: ‘Microsoft.Extensions.Hosting.WindowsServices’ to run as a service, ‘RabbitMQ.Client’ to use RabbitMQ, and ‘System.Text.Json’ for serializing and desierlizing C# classes into JSON.
The sender project has the regular ‘Program.cs’ and a ‘QueueWorker.cs’ file. Let’s look at the QueueWorker file first
using Microsoft.Extensions.Hosting;
using RabbitMQ.Client;
using Shared;
using System.Text;
using System.Text.Json;

namespace Sender
{
    internal class QueueWorker : BackgroundService
    {
        private const string QueueName = "SampleQueue";
        private Timer timer;
        private IConnection connection;
        private IModel channel;

        protected override Task ExecuteAsync(CancellationToken stoppingToken)
        {
            var factory = new ConnectionFactory() { HostName = "localhost" };
            factory.UserName = "guest";
            factory.Password = "guest";
            connection = factory.CreateConnection();
            channel = connection.CreateModel();
            channel.QueueDeclare(queue: QueueName,
                                durable: true,
                                exclusive: false,
                                autoDelete: false);

            timer = new Timer(OnTimer, null, 0, 5000);
            return Task.CompletedTask;
        }

        private void OnTimer(object? state)
        {
            var payload = new Payload()
            {
                Message = $"on timer {DateTime.Now}"
            };

            var properties = channel.CreateBasicProperties();
            properties.Persistent = true;

            var body = Encoding.UTF8.GetBytes(JsonSerializer.Serialize(payload));
            channel.BasicPublish(exchange: string.Empty,
                routingKey: QueueName,
                basicProperties: properties,
                body: body);
        }

        ~QueueWorker()
        {
            channel.Close();
            connection.Close();
            channel.Dispose();
            connection.Dispose();
        }
    }
}
First up, this inherits from the ‘BackgroundService’ class. This allow this file to be used as a service (windows service, etc.) on any platform. This is similar to Topshelf but on Windows you must install and uninstall them manually. Next is the function ExecuteAsync which must be overridden to implement the BackgroundService class. This class performs a number of actions:
- First, it creates a ConnectionFactory object using the host name (which in this case is ‘localhost’).
- Then, it sets the username and password (which are ‘guest’ for localhost).
- Then, it creates the connection from the factory.
- Then, it creates the channel (which contains the channel, connection and the model) from the connection using the function ‘CreateModel’.
- Next, it declares the queue, which will create it if it’s not already created. This has a few parameters:
- queue – the queue name.
- durable – the queue will survive a RabbitMQ node restart
- exclusive – used by only one connection and the queue will be deleted when that connection closes
- autodelete – queue that has had at least one consumer is deleted when last consumer unsubscribes.
- Finally, I create a Timer that calls the OnTimer function with a null state, and starts immediately and repeats every 5 seconds.
- Next, I’m returning ‘Task.CompletedTask’ since I’m not using any async methods. Let’s talk about the OnTimer method next.
The OnTimer method gets called every 5 seconds.
- The first thing it does is creates a new payload object with a message with the current DateTime as a string.
- Then, it creates the properties and sets Persistent to true. This property tells RabbitMQ to store messages on a drive rather than just hold them into memory (in case of a crash).
- Then, it creates the body using the payload. This uses the JSON serializer to convert the payload into a string. Then it encodes it to a UTF8 byte array.
- Then it publishes the payload on the queue. This has a few parameters
- exchange – not using in the tutorial
- routingKey – the queue name
- basicProperties – the properties object
- body – the payload
At the bottom is the destructor which closes and disposes the channel and connection. NOTE: opening a connection/channel is time consuming so be sure to keep it as a private class variable.
Let’s look at the Program.cs file next
using Microsoft.Extensions.Hosting;
using Microsoft.Extensions.DependencyInjection;
using Sender;

Console.WriteLine("System started");

using IHost host = Host.CreateDefaultBuilder(args)
    .UseWindowsService(options =>
    {
        options.ServiceName = "Rabbit MQ sender";
    })
    .ConfigureServices(services =>
    {
        services.AddHostedService<QueueWorker>();
    })
    .Build();

await host.RunAsync();
First, it creates the default builder (Host.CreateDefaultBuilder), then calls UseWindowsService, and sets the service name in the body. From there, it calls ConfigureServices and sets the QueueWorker as a hosted service. Finally, it starts the service via host.RunAsync. I believe this is pretty self explanatory.
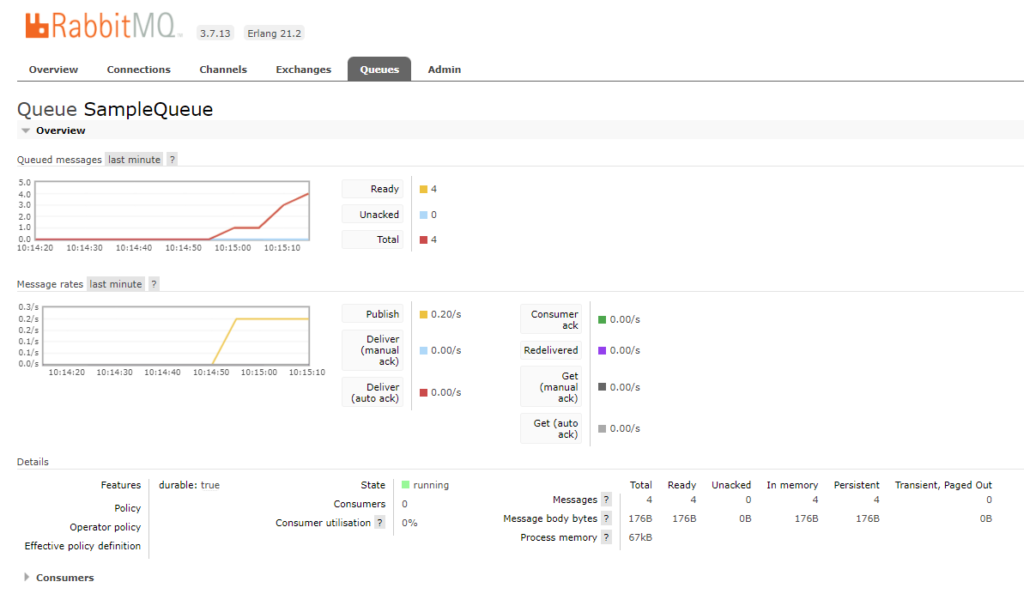
If you run this project and open the RabbitMQ web interface, you should notice messages being placed in the SampleQueue.
Great! Next, let’s look at the Receiver project. We’ll start with the QueueWorker.cs file.
using Microsoft.Extensions.Hosting;
using RabbitMQ.Client;
using RabbitMQ.Client.Events;
using Shared;
using System.Text;
using System.Text.Json;

namespace Receiver
{
    internal class QueueWorker : BackgroundService
    {
        private IModel channel;
        private IConnection connection;

        protected override Task ExecuteAsync(CancellationToken stoppingToken)
        {
            var factory = new ConnectionFactory() { HostName = "localhost", DispatchConsumersAsync = true };
            factory.UserName = "guest";
            factory.Password = "guest";

            var queueName = "SampleQueue";

            connection = factory.CreateConnection();
            channel = connection.CreateModel();
            channel.QueueDeclare(queue: queueName,
                                 durable: true,
                                 exclusive: false,
                                 autoDelete: false,
                                 arguments: null);
            channel.BasicQos(prefetchSize: 0, prefetchCount: 1, global: false);
            var consumer = new AsyncEventingBasicConsumer(channel);
            consumer.Received += ReceiveData;
            channel.BasicConsume(queue: queueName,
                     autoAck: false,
                     consumer: consumer);
            return Task.CompletedTask;
        }

        private Task ReceiveData(object sender, BasicDeliverEventArgs @event)
        {
            var payload = JsonSerializer.Deserialize<Payload>(Encoding.UTF8.GetString(@event.Body.ToArray()));
            Console.WriteLine("Received: " + payload.Message);
            channel.BasicAck(deliveryTag: @event.DeliveryTag, multiple: false);
            return Task.CompletedTask;
        }

        ~QueueWorker()
        {
            channel.Close();
            connection.Close();
            channel.Dispose();
            connection.Dispose();
        }
    }
}
Once again, this inherits from the BackgroundService class and overrides the ExecuteAsync function.
- First, I create the ConnectionFactory with the host name, and I set ‘DispatchConsumersAsync’ to true. This allows the callback to be asynchronous (async/await).
- Next, I set the username and password (just like the Sender project).
- Then I create the connection, and then create the channel and then declare the queue. (This is just like the Sender project.)
- Then, I call ‘channel.BasicQos’ which sets the quality of service. This tells RabbitMQ not to give more than one message to a worker at a time. Or, in other words, don’t dispatch a new message to a worker until it has processed and acknowledged the previous one. Instead, it will dispatch it to the next worker that is not busy.
- Next, I create the consumer which is of type ‘AsyncEventingBasicConsumer’ and takes the channel.
- Next, I set the ‘consumer.Received’ event to the ReceiveData function. This will call the ReceiveData function when a new message is received.
- Then, I call ‘channel.BasicConsume’ which takes a few parameters:
- queue – the name of the queue to receive messages for
- autoAck – auto acknowledge once the message has been dispatched. If this is set to false, then we need to send an acknowledge message back to RabbitMQ when we’re finished with the message.
- consumer – the consumer configured earlier
- Finally, this returns ‘Task.CompletedTask’ since I’m not using async/await.
Let’s look at the ‘ReceiveData’ function.
- First, it deserializes the payload. It grabs the event body (which is of type ReadonlyMemory<byte>) and converts that to an array. Then converts that to a UTF8 string, and then uses the JSON serializer to deserialize the data to our Payload class.
- Then, it writes the received message to the console.
- Next, it acknowledges that it’s finished with the message (channel.BasicAck). This uses the injected event object’s DeliverTag property. This tells RabbitMQ that we’re ready for another message.
- Finally, we return ‘Task.CompletedTask’ since we’re not using async/await.
Also, there’s a destructor that closes and disposes both the channel and the connection.
Ok that’s done, let’s look at the Program.cs file in the Receiver project.
using Microsoft.Extensions.Hosting;
using Microsoft.Extensions.DependencyInjection;
using Receiver;

Console.WriteLine("System started");

using IHost host = Host.CreateDefaultBuilder(args)
    .UseWindowsService(options =>
    {
        options.ServiceName = "Rabbit MQ Receiver";
    })
    .ConfigureServices(services =>
    {
        services.AddHostedService<QueueWorker>();
    })
    .Build();

await host.RunAsync();
As you can see, this is exactly like the Sender’s Program.cs file, except for the service name is different. Not going to go over this again.
So, if you execute the sender and the receiver projects at the same time then every 5 seconds, you should see the receiver printing out the message that was received.
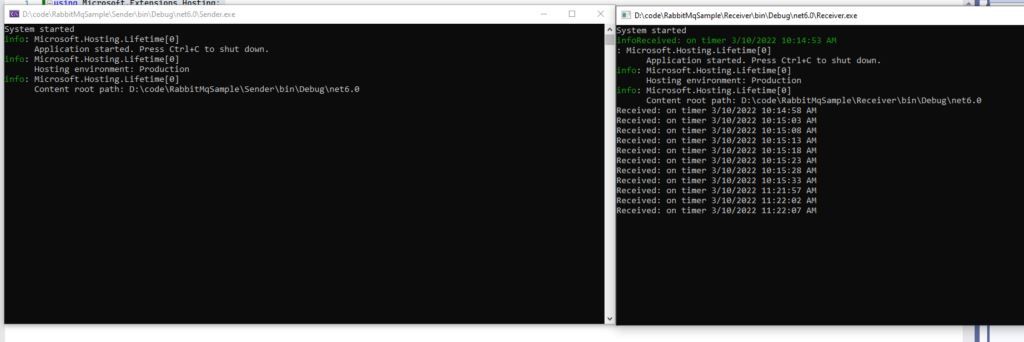
As you can see, the receiver is printing out the received messages that it has received from RabbitMQ. It works! I hope you enjoyed this, and thanks for stopping by!